Introduction
Besides all techniques created until today, every software developed can have bugs. Computer software nowadays can be easily updated to a new versions to fix all those bugs and it doesn’t take anything more than a few mouse clicks. Embedded software ou bare bone firmware can have bugs too, but update to new versions is not always that simple as in computers software.
In embedded systems we need to develop a piece of code which (in theory) is programmed only once and is the very first program to run after a reset. This program is known as bootloader. If for any reason we need to upgrade a bootloader, care must be taken because if the upgrade fail, anything will work after a reset.
In bigger embedded systems, normally the bootloader already exists and is quite stable and robust, i.e. [1]Das UBoot. Nowadays lots of MCU have already an embedded a bootloader where we can update main firmware by some serial communication, i.e. SPI and UART. But sometimes there is a need to develop a custom bootloader and this is the subject of this post.
Bootloader structure
In this post we’ll use the microcontroller STM32F030CC, an ARM Cortex-M0 with 256k of flash. As mentioned before, the bootloader is the very first program to be executed after a reset. This MCU has the following memory map.

Figure 1 – STM32F0 memory map
After a reset, this microcontroller fetchs instructions from address 0x0000 0000. Notice that the flash memory starts at address 0x0800 0000. This MCU has the capability to remap address 0x0000 0000 to the flash, RAM or system memory which is the embedded bootloader.
This means that if the RAM is remapped to 0x0000 0000, accessing address 0x0000 1000 is the same as accessing address 0x2000 1000. After a reset, by default, internal flash is remapped to 0x0000 0000. If no data is programmed in the first address, the microcontroller will remap system memory and then execute internal bootloader automatically.
Once we know all this, we must prepare the custom bootloader to be [2] linked on the beginning of internal flash and the main firmware in some memory after bootloader. As an example, we could have the first 4k for bootloader and the rest of the flash for main app.

Figure 2 – Flash split in two regions
Interrupt vector table
The STM32F030CC has a [3][4] interrupt vector table located on the first 192 bytes of memory.
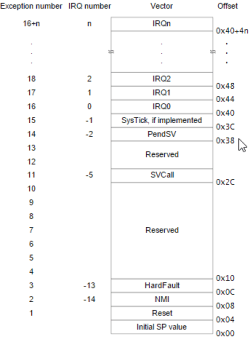
Figure 3 – Interrupt vector table STM32F030CC
As we can see above, the first address actually stores the initial stack pointer value. The second address stores the address of the reset interrupt handler. This is important to understand because later we’ll how we remap the interrupt vectors in main firmware.
Linker
Every code compiled is linked. The linker needs a linker file (a [5] .ld file) where it gets all instructions to place functions, variables etc in the correct address. For GNU linker, the memory is defined in the section MEMORY. In our example, we’ll leave 4k for the bootloader and the rest for the main application. Just remember that this script can and should be used by bootloader and main firmware.
/* Memory definition */
MEMORY
{
  RAM (xrw)       : ORIGIN = 0x200000C0, LENGTH = 32K - 192  /* 192 for vector table  */
  BOOTLOADER (rx) : ORIGIN = 0x08000000, LENGTH = 4K
  FIRMWARE (rx)   : ORIGIN = 0x08001000, LENGTH = 256K - 4K
}
/* Main app start address symbol */
_main_app_start_address = 0x08001000;

/* For main application, change BOOTLOADER by FIRMWARE */
REGION_ALIAS("ROM", BOOTLOADER );

/* Sections */
SECTIONS
{
  /* The startup code into ROM memory */
  .isr_vector :
  {
    . = ALIGN(4);
    KEEP(*(.isr_vector)) /* Startup code */
    . = ALIGN(4);
  } >ROM

  /* The program code and other data into ROM memory */
  .text :
  {
    . = ALIGN(4);
    *(.text)           /* .text sections (code) */
    *(.text*)          /* .text* sections (code) */
    *(.glue_7)         /* glue arm to thumb code */
    *(.glue_7t)        /* glue thumb to arm code */
    *(.eh_frame)

    KEEP (*(.init))
    KEEP (*(.fini))

    . = ALIGN(4);
    _etext = .;        /* define a global symbols at end of code */
  } >ROM

...
There are two regions defined, BOOTLOADER which starts at 0x0800 0000 with 4k and FIRMWARE which starts at 0x0800 1000 with 252k.
We defined a symbol to indicate where the main application starts. This is useful to avoid having [6] magic numbers and to get things easier if we need to change memories later.
Just pay attention that in our script the internal flash is defined as ROM. We can see that in the script file .isr_vector, .text are placed in flash (>ROM). Sometimes it can be another name, just check the correct name and set REGION_ALIAS and you are all set.
It’s important to notice to tell to the linker to not use the first 192 bytes of the RAM since they will be used to remap the interrupt vector table. So, in MEMORY section, our RAM starts at address 0x2000 00C0 and has 32k – 192 bytes.
Bootloader
The bootloader in most of cases, must be a simple and robust program with only one goal: receive an image and reprogram internal flash. Keep it simple reduce code size and is decreases the possibility to have bugs.
The image can be an [7] .hex file which is generated by the toolchain. We won’t describe in detail how we receive an image, how we can store it and how we write it on flash because this process is straightforward. But in generally, the process consist in sending the image to the MCU which can save on an external EEPROM/flash or even in a region of internal flash. It’s always a good idea to calculate the image CRC to be sure that we received everything correct. Once image received, it’s only a matter to copy it to the internal flash following the address indicated on .hex file.
Now, after image written on flash, the bootloader must take some actions before jump to main program:
- Reconfigure stack pointer
- Disable global and specific peripheral interrupts
/**
 * Jump to application
 */
void JumptoApp(void)
{
    // disable global interrupt
    __disable_irq();

    // Disable all peripheral interrupts
    CPU_NVIC_DisableIRQ(SysTick_IRQn);
    CPU_NVIC_DisableIRQ(USART2_IRQn);

    CPU_NVIC_DisableIRQ(WWDG_IRQn);
    CPU_NVIC_DisableIRQ(RTC_IRQn);
    CPU_NVIC_DisableIRQ(FLASH_IRQn);
    CPU_NVIC_DisableIRQ(RCC_IRQn);
    CPU_NVIC_DisableIRQ(EXTI0_1_IRQn);
    CPU_NVIC_DisableIRQ(EXTI2_3_IRQn);
    CPU_NVIC_DisableIRQ(EXTI4_15_IRQn);
    CPU_NVIC_DisableIRQ(DMA1_Channel1_IRQn);
    CPU_NVIC_DisableIRQ(DMA1_Channel2_3_IRQn);
    CPU_NVIC_DisableIRQ(DMA1_Channel4_5_IRQn);
    CPU_NVIC_DisableIRQ(ADC1_IRQn);
    CPU_NVIC_DisableIRQ(TIM1_BRK_UP_TRG_COM_IRQn);
    CPU_NVIC_DisableIRQ(TIM1_CC_IRQn);
    CPU_NVIC_DisableIRQ(TIM3_IRQn);
    CPU_NVIC_DisableIRQ(TIM6_IRQn);
    CPU_NVIC_DisableIRQ(TIM7_IRQn);
    CPU_NVIC_DisableIRQ(TIM14_IRQn);
    CPU_NVIC_DisableIRQ(TIM15_IRQn);
    CPU_NVIC_DisableIRQ(TIM16_IRQn);
    CPU_NVIC_DisableIRQ(TIM17_IRQn);
    CPU_NVIC_DisableIRQ(I2C1_IRQn);
    CPU_NVIC_DisableIRQ(I2C2_IRQn);
    CPU_NVIC_DisableIRQ(SPI1_IRQn);
    CPU_NVIC_DisableIRQ(SPI2_IRQn);
    CPU_NVIC_DisableIRQ(USART1_IRQn);
    CPU_NVIC_DisableIRQ(USART2_IRQn);
    CPU_NVIC_DisableIRQ(USART3_6_IRQn);

    // main app start address defined in linker file
    extern uint32_t _main_app_start_address;

    uint32_t MemoryAddr = (uint32_t)&_main_app_start_address;
    uint32_t *pMem = (uint32_t *)MemoryAddr;

    // First address is the stack pointer initial value
    __set_MSP(*pMem); // Set stack pointer

    // Now get main app entry point address
    pMem++;
    void (*pMainApp)(void) = (void (*)(void))(*pMem);

    // Jump to main application (0x0800 0004)
    pMainApp();
}
Main application
This is the program which will be executed after the bootloader. Since we have a bootloader which was running before, all interrupt vectors are referenced not referenced to the main application. Instead they are pointing to interrupt handler in bootloader. So we need to remap the interrupt vector to point to main firmware. On Cortex-M0 microcontrollers, this is done by copying the interrupt vector table to the RAM and then remapping address 0x0000 0000 to the RAM as explained before. When an interrupt occurs, it will access somewhere between 0x0000 0000 and 0x0000 00C0 which finally is the vector table in RAM.
This remap must be done as soon as possible in the main firmware and, of course, before any interrupt be enabled. Below we have an example, just keep in mind that the code uses some API functions from [8] STM Cube Mx.
#define FIRMWARE_START_ADDR (uint32_t)(&_main_app_start_address)
void Remap_Table(void)
{
    // Copy interrupt vector table to the RAM.
    volatile uint32_t *VectorTable = (volatile uint32_t *)0x20000000;
    uint32_t ui32_VectorIndex = 0;

    for(ui32_VectorIndex = 0; ui32_VectorIndex < 48; ui32_VectorIndex++)
    {
        VectorTable[ui32_VectorIndex] = *(__IO uint32_t*)((uint32_t)FIRMWARE_START_ADDR + (ui32_VectorIndex << 2));
    }

    __HAL_RCC_AHB_FORCE_RESET();

    //  Enable SYSCFG peripheral clock
    __HAL_RCC_SYSCFG_CLK_ENABLE();

    __HAL_RCC_AHB_RELEASE_RESET();

    // Remap RAM into 0x0000 0000
    __HAL_SYSCFG_REMAPMEMORY_SRAM();
}

Figure 4 – Interrupt vector table remap diagram
UPDATE: Don’t forget to enable global irq in main app in order to enable interrupts after initialization, since it has been disabled before jumping to main app.
__enable_irq();
Conclusion
Embedded system has increased complexity and is very easy to have bugs. We need a way to update firmware in order to fix problems without a specific programmer ou specific tool and if possible remotely. A bootloader can get things much easier for this kind of task.
When developping a bootloader, we need to pay attention in few items, listed belos:
- Create two separated memory regions in linker
- Process an image, send to bootloader which must save somewhere. The use of CRC is a must to avoid corrupted image.
- After reprogram flash, disable all interrupts, set stack pointer and jump to main application
- In the main application, remap interrupt vector table as soon as possible.
In this post we just discussed the main steps to develop a custom bootloader. There are some issues important not discussed here like security. The image can be encrypted and then saved in flash to avoid illegal copies. There are mechanisms to increase robustness of the bootloader but this is a personal choice and sometimes a constraint in the system.
References
Marcelo Jo is an electronics engineer with 10+ years of experience in embedded system, postgraduate in computer networks and masters student in computer vision at Université Laval in Canada. He shares his knowledge in this blog when he is not enjoying his wonderful family – wife and 3 kids. Live couldn’t be better.

 I'm an electronics engineer with 10+ years of experience in embedded system, hardware and firmware development for several 8/16/32 bits microcontrollers like 8051, Microchip, MSP430, Freescale, ARM, etc. I'm a passionate in electronics and embedded systems, but not a nerds! =P


Found this really useful for setting up bootloader, thank you!
Thanks so much for this Tutorial. It worked perfectly well for me. I am using the STM320f42k6. I first wrote the Bootloader from 0x0800000 until 0x08000BFF(3Kbyte) then the Application from 0x08000C00 until 0x08007FF(29Kbyte). Now I wish to do the opposite that is I wish place the Application at the start address, that is 0x08000000 until 0x080073FF(29Kbyte) and the Bootloader from 0x08007400 till 0x08007FFF(3Kbyte). I did all the necessary modifications in the linkerscript but I am unable to debug the bootloader. I will be very greatfull if someone could give me some help. Thanks in advance.
Did you tried to change in the compiler settings where to place your code? I mean, try to put an offset on the address code and program it normally, it should work ( I guess).
My code is placed in the Flash.I dont understand what you mean by putting an offset on the address code. Please explain me better. I have found out that any Application starting at the address (for example 0x08000C00) other than the normal base address (0x08000000) does not work as standalone Application.Thats the problem I am facing. I wrote a simple LED Blink Application starting at 0x08000C00 but did not work.
NB: I AM WORKING WITH THE NUCLEO STM32F042K6 BOARD.
When I debug it says “No source available for 0xfffffffe”
Thanks in advance for your reply.
Curiously, the STM32L0 (Cortex M0+) seems to have a VTOR. Any idea what to do in that case? There’s not as much info out there about the M0+, can I just follow M3/M4 tutorials?
Sorry for the late reply,
Yes, most probably you can follow M3/M4 guides since VTOR is made for this purpose. Good luck! =D
in above code main application written in flash but vector is remapped to SRAM then how it works?
You must understand Figure 4. It show how the mapping works.
Thank you for your response. In figure 4 we are remapping 8001000 to 20000000 and then we are remapping 20000000 to 00000000 location am I correct ? If so why couldnt we execute the code from flash.
The map on the left is showing where is the interrupt vectors for the bootloader(0x00000000). The map on the right is showing how your main app shall remap the interrupts since they are pointing to the bootloader interrupt vectors.
This is the part of the post which explain it:
“This is the program which will be executed after the bootloader. Since we have a bootloader which was running before, all interrupt vectors are referenced not referenced to the main application. Instead they are pointing to interrupt handler in bootloader. So we need to remap the interrupt vector to point to main firmware. On Cortex-M0 microcontrollers, this is done by copying the interrupt vector table to the RAM and then remapping address 0x0000 0000 to the RAM as explained before. When an interrupt occurs, it will access somewhere between 0x0000 0000 and 0x0000 00C0 which finally is the vector table in RAM.”
I couldnt understand one thing in 8001000 address we have our firmware code
Here we were mapping the firmware code to vector table.While developing firmware application from 8001000 will first 192 bytes be left free? After 192 bytes will our firmware code present?
Hello Marcelo,
I didn’t understand one thing:
When you jump to application, what is function called?
I mean, what function will be the “int main (void)” of my application? Because in this case, the original “int main (void)” will be used in the bootloader.
Hi,
You’ll have two programs, the bootloader and the main firmware. So you’ll have two main function, one for each program.
In the bootloader, you must jump to your main function in the main firmware.
Nice and very easy to understand, thank for sharing. But I am having some doubts:
1.My Linker don’t have REGION_ALIAS written so should I copy directly in it?
2. This
/* Main app start address symbol */
_main_app_start_address = 0x08001000;
I have defined this macro in code with some other name, so should I write my macro name or as above in Linker?
Hi,
1) Which compiler are you using? Check this link for REGION_ALIAS
https://sourceware.org/binutils/docs/ld/REGION_005fALIAS.html
2) You should use the same variable name. What is define in the linker will be defined in the source code. If it’s different you’ll get an error while compiling the code.
Hi,
1) I am using Keil MDK5
2) Ok. But in my Linker no such address variable is written? how? and why you wrote this address variable in linker?
I define this variable in linker in order to use it in the program, so you won’t need to put a magic number as address in the code.
Ok. Now I have done as you said. But while jumping to the application code, the MCU goes to Hardfault Interrupt.
Try to do exactly as the post do, it works. Than you can start tweaking and understand what is going on.
You can also use
_main_app_start_address = ORIGIN(FIRMWARE);
to get rid of magick constant also in linker script.
Hi!
Nice to know! Thank you for sharing!
With point 5 is something wrong (I do not why… :/) –> I am sorry… (maybe it was to long)
5. In FIRMWARE program first function in main is Remap_Table(); I tried set __enable_irq(); after Remap_table(); and before main while loop and in other places from Remap_table() to main while loop and it does not work.
6. I did test with FIRMWARE and set in linker:
——————————————————————————–
MEMORY
{
BOOTLOADER (rx): ORIGIN = 0x08000000, LENGTH = 24K
FIRMWARE (rx) : ORIGIN = 0x08006000, LENGTH = 256K – 24K
RAM (xrw) : ORIGIN = 0x200000C0, LENGTH = 32K – 192 /* 192 for vector table */
}
/* Main app start address symbol */
_main_app_start_address = 0x08006000;
/* For main application, change BOOTLOADER by FIRMWARE */
REGION_ALIAS(“FLASH”, BOOTLOADER);
——————————————————————————–
then I deleted Remap function and __enable_irq();, compiled it and writed it to MCU by programmer –> blinking by while loop and IRQs worked good.
So what can I do now ?
The solution of this problem is that:
Jump function can’t be in interrupt. I had jump function in interrupt and that is why my main progranm IRQs doesn’t work. I moved it in the main loop and everything is working correctly now. Probably problem is exactly in setting stack pointer inside interrupt.
Marcelo Thank You for Your HELP and time.
Have nice day !
Dawid Kozub
Hi Dawid,
I spent 3 days with looking how to fix exactly the same issue that you had. And thanks to your posts I was able to solve it. Dawid and marcelojo big thanks to you both.
Martin
Really glad that we could help you!
Hi, this guide is very helpful. Thank You very much !
But I have a problem with starting IRQs.
I have stm32f030RCT6 and I am using ECLIPSE with SW4STM32 and CUBE MX.
I writed bootloader as You exactly show in guide (my bootloader have 24K space)
and I writed simply firmware with blinking LEDs for testing…
When I blink LEDs using simple loop it is working, but when I want to blink using IRQs, it does not wok.
few posts ago was posted:
—————————————————————-
MarkV6 says:
February 14, 2017 at 4:32 pm
Thanks for your help Marcelo.
My uploaded program generated with CubeMX did not enable the interrupts so simply __enable_irq(); after the HAL_init did the trick.
Thanks for your quick response
Mark
—————————————————————-
and I think, i may have the same problem…
Can You describe what i shoud do in SW4STM32 with HAL libraries ?
Dawid
Hi Dawid,
I added an update
UPDATE: Don’t forget to enable global irq in main app in order to enable interrupts after initialization, since it has been disabled before jumping to main app.
Just call __enable_irq() function once everything has been initialized. Normally you do in your main file before the main loop.
I did it and it does not work. Where can a try to find a problem ? What shoud I check ? Please give me some advice, because I fight with this from yesterday…
Could you please explain better your problem? When you say: “It doesn’t work” what do you mean?
Can you debug and check if the interruption is working? This same code works without the bootloader? (just to check if the interrupt has been well set).
Did you do the remap correctly? Checked the linker?
Thank You very much for fast reply.
When I said “It does not work” I mean Your advice: “Just call __enable_irq() function once everything has been initialized.”
Ok, what I did:
1. I have bootloader which is prepared with your guide
Linker file:
——————————————————————————–
/* Specify the memory areas */
MEMORY
{
BOOTLOADER (rx): ORIGIN = 0x08000000, LENGTH = 24K
FIRMWARE (rx) : ORIGIN = 0x08006000, LENGTH = 256K – 24K
RAM (xrw) : ORIGIN = 0x200000C0, LENGTH = 32K – 192 /* 192 for vector table */
}
/* Main app start address symbol */
_main_app_start_address = 0x08006000;
/* For main application, change BOOTLOADER by FIRMWARE */
REGION_ALIAS(“FLASH”, BOOTLOADER );
——————————————————————————–
2. Jump function is copied exactly from You, but I am using HAL functions:
CPU_NVIC_DisableIRQ(SysTick_IRQn); –> HAL_NVIC_DisableIRQ(SysTick_IRQn);
CPU_NVIC_DisableIRQ(WWDG_IRQn); –> HAL_NVIC_DisableIRQ(WWDG_IRQn);
…
3. I have simply FIRMWARE program which blinking one led using while loop and shoud blinking second led using IRQs –> void HAL_SYSTICK_Callback(void);
Blinking by IRQs not working. Blinking by while loop is working
4. Linker file from FIRMWARE:
——————————————————————————–
/* Specify the memory areas */
MEMORY
{
BOOTLOADER (rx): ORIGIN = 0x08000000, LENGTH = 24K
FIRMWARE (rx) : ORIGIN = 0x08006000, LENGTH = 256K – 24K
RAM (xrw) : ORIGIN = 0x200000C0, LENGTH = 32K – 192 /* 192 for vector table */
}
/* Main app start address symbol */
_main_app_start_address = 0x08006000;
/* For main application, change BOOTLOADER by FIRMWARE */
REGION_ALIAS(“FLASH”, FIRMWARE );
——————————————————————————–
5. In FIRMWARE program first function in main is Remap_Table(); compiled it and writed it to MCU by programmer, blinking by while loop and IRQs worked good.
Hi Marcelojo,
When exactly the remapping is required to be done . Is it just “after” jumping to main application or just “before” jumping to the main application??.
The article says Remap_Table() should be called in the application. I’m experimenting with doing the same work in the bootloader instead, so the application doesn’t need any magic.
Hi Alastair,
Yeah, good idea, this makes main app transparent. But keep in mind that you must place main app at the same address always for all projects you’ll use your bootloader, since the bootloader is guessing the addresses of the main app!
I’ve confirmed that doing the contents of Remap_Table() in the bootloader works, so you don’t need any magic in the application.
Thats exactly what I am trying. I have 2 questions.
1) How will u get to know where exactly IVT of application is located i.e. from which address it starts and which address it ends?
2) How will you restrict the IVT of application to certain memory address?
The linker file sets up the application vector table with the correct addresses. The application vector file is always located at the start of the application address space. The layout of the vector table is documented here: http://infocenter.arm.com/help/index.jsp?topic=/com.arm.doc.dui0662a/BABIFJFG.html
Marcel’s Remap_Table() implementation can pretty much just be inlined into the JumpToApp call. The only alteration I did was to add the call to __enable_irq() before the final call to the application.
Thank you Alastair for sharing.
We need to remap because otherwise all interrupts will be served by the functions addressed in the interrupt vector. In our example, we could have uart being used in bootloader. Once you go to main app, you want your main app ISR to respond to the interruption and not the one in bootloader.
You should do in the main app because in bootloader you don’t know where your main code will place the stuffs. Of course if you decide to put always at same address, I think you could do that.
Hello,
Can I ask why you need to force reset the AHB bus before enabling SYSCFG clock?
Also, is it necessary to clear each peripheral interrupt or just those used by the bootloader application?
Hi, don’t remember why we need to reset the AHB bus before, there is so long time ago I dig and wrote this article, sorry! =D And I did for everybody to be as general as possible. Like that I don’t need to remember why or change anything later. =D
Hi, thanks for taking the time to write this, I’m developing some 1wire devices based on the STM32f0, and this means I’ll be able to flash them across the 1wire bus, rather than having to connect a programmer to each one for firmware updates.
One question, is there any reason why the interrupt table remap can’t be done in the bootloader rather than the application?
It’s because normally you’ll need to use the interrupts in the bootloader. Another thing is that in the main app you’ll change your linker file accordingly. If you do the remap in the bootloader, you’ll actually will have to do it twice, one for serving interrupts for bootloader and again to remap to the interrupts for main app.
Sorry, I meant setting up the application interrupt table in JumpToApp(), after the bootloader has done whatever it needed to, and disabled all interrupts. The bootlooader should then be able to do the same work as Remap_Table(), before setting up the stack pointer and calling the application.
Hi Marcelo
I am trying to make a customized bootloader on STM32F091RC. Your article has been very helpful. I am facing problems in copying the IVT to RAM and remapping it. I need your help. Is it possible to confine the IVT of main Application to specific memory location. How to do that. If u can guide stepwise for the final IVT remapping part it will be very helpful.
I’m affraid to tell you that you can’t. your IVT must be at the beginning of your RAM since the remap is done internally in your MCU. From the post:
“This MCU has the capability to remap address 0x0000 0000 to the flash, RAM or system memory which is the embedded bootloader.”. I think you can’t chose where in RAM you can remap it.
There is a separate IVT for main Application. Is the size of IVT fixed? . The function my Bootloader has to do is, It has to take the hex file of main application, it has to extract data and address and flash the data at that particular address. Now i have the hex file but i dont know which part of it is IVT. The entire hex file of application is flashed by my bootloader in the flash memory but i dont know to which memory address my IVT is limited to. So i dont know which part of the memory( which consists IVT) has to be copied to RAM and then remapped. Please clear my doubt
I’m trying to jump to the main application but for some reason it is falling into the hard fault handler. It is reading the correct value from flash but when it tries to jump to the address it just fails. I’ve looked at the assembly and it is doing a BLX to address 0x08010245, which is definitely the value stored as the reset handler in the main application. It is also definitely falling into the hard fault handler of the bootloader. I’m at a bit of a loss so any pointers to what I should be looking for would be greatly appreciated.
Are you disabling all interrupts before trying to jump? You must disable global and all those enabled in bootloader. Because otherwise if you disable only the global interrupt, depending on your code, as soon you enable interrupts during the start up the peripheral may not be configured properly yet.
Another thing you must reset your stack pointer… I guess you are using the code from the example as template, but not using it as it is, right? Are you using the same MCU? Check the memory map.
You could try to test to debug in bootloader and try to jump to the start of bootloader to restart code again step-by-step.
Good luck
Thanks for the quick response. It was to do interrupts, but it was the interrupts in the application code that was at fault. I’m using an RTOS (for the first time) in the application. A misunderstanding about how the RTOS actually starts meant I thought I was updating the vector table straight away but the RTOS was actually firing an interrupt before that part of the code was reached. I have now placed the vector remap at the beginning of SystemInit.
Thanks again for your help.
Cool.. yes, I was wondering what was happening in the main app about the interruption not being properly set.
Good luck!
Hi,
Thanks for your manual. I did exactly what you described however my blinking led upload .bin file will only blink when i use a long for loop. When using the HAL_Delay the program locks.
The HAL_Delay does not use IQR’s i guess? What could be wrong?
Hi,
I guess your interrupt vector is not well mapped, so when an interrupt occurs, it will fail. Maybe it’s even mapped to a default ISR which has a loop like while(1);
Try to check if you remapped correctly your interrupt vector.
Good luck
There might be something wrong with FIRMWARE_START_ADDR why not use _main_app_start_address is it not the same? In you example it is 0x08001000 ?
Any chance you can look at my code?
Hi,
Yeah, it’s missing the define of FIRMWARE_START_ADDR, sorry. I’ll update the post!
#define FIRMWARE_START_ADDR (uint32_t)(&_main_app_start_address)
Thanks but still no IRQ’s for me. I’m using the discovery with the STM32F072. My uwTick stays at zero. That is why the watchdog comes in. The vector table is also 0xC0 long. Any idea why my Remap_Table does not work? I call it before HAL_Init.
Thanks for your help Marcelo.
My uploaded program generated with CubeMX did not enable the interrupts so simply __enable_irq(); after the HAL_init did the trick.
Thanks for your quick response
Mark
Hi,I have received your message and thank you for your response.
My question was quite complicated and I couldn’t explain it clearly.I am trying to create same type of application in my project and following some instructions from yours.
But Unfortunately , I am stuck in creating linker file.
I was not able to do it .Because I have created my program based on Keil-uvision Arm compiler and linker script option was not available for this condition.
There is only scatter file option in Arm compiler mode of Keil.
Could you please inform me as What kind of process should I apply in order to create the linker file for arm compiler.
Should I convert GNU linker script to Arm scatter file and how?
I couldn’t find any articles about relevant case.
Hi,
I just would like to integrate it for flash memory programming and bootloader application of my stm32f103c8t6 arm microcontroller.
I am planning to use eeprom to store program software data inside, it uses I2C communication protocol and I already created read and write method of this eeprom.
So I just would like to learn how to manage to write recieved data from eeprom to flash memory and change vector table to keep ex software and run new software in different adresses.
I am planning to keep ex file in 1, part of flash memory for failure and write new software to 2. part of flash memory.Then I would like to update 1. program software to 2. program software with bootloader.If There is something wrong in 2. program software(new), I would like to update it with 1. program software(ex) again from flash memory with bootloader.
Is there any possibility do it and how?
I am new in arm stm32 microcontrollers, I don’t know that much for flash memory programming and bootloader and I am trying to write it in C programming(Keil compiler).Linker part of your design is unclear for me and I don’t know how to manage it.
Any help would be kindly apreciated
Thank you by now
Marcelojo, using a CRC sounds like a really good idea until you look at the available RAM in a low end controller (M0 Cortex). If the boot loader is serial, as most are for this kind of processor, the entire image can not be received to verify the CRC prior to starting re-flashing. So the choices are sending the image twice, once to calculate the CRC and another time for programming, but that allows errors to occur in the second transmission. Or adding an external memory device to hold the update, or limiting the program size to only 1/2 of the available app flash on 1K boundaries. 1/2 to hold and 1/2 for working app.
Yes you’re right. I think you can either split internal flash or add an external flash. I don’t think it’s a good idea to send twice the same image. The fact that the first image has been received correctly doesn’t mean that you’ll receive the second correct as you mentioned in your comments.
When adding an external flash, you could even use some cryptography to avoid someone pocking your code!
Thank you for your comment.
hi
i am trying to write a bootloader program ,the main application programs use RTOS.which hangs immediately upon jump .
Without the RTOS jump is successful and code is running correctly
i am using stm32f030CC and using mbed for development.
In the normal condition i am able to jump without doing the above procedure just using the __set__MSP function.
however when i use RTOS,after the jump ,the program hangs.
i tried your above suggestion.however with a slight modifiction to the remap table function
#define FIRMWARE_START_ADDR 0x08000000
void Remap_Table(void)
{
// Copy interrupt vector table to the RAM.
volatile uint32_t *VectorTable = (volatile uint32_t *)0x20000000;
uint32_t ui32_VectorIndex = 0;
uint32_t *old_vectors = (uint32_t *)FIRMWARE_START_ADDR;
for(ui32_VectorIndex = 0; ui32_VectorIndex CFGR1 |= 0x03;
}
however the program,hangs in the reset table function
can you kindly help me debug the above issue.
Hi,
You should check how RTOS manage its RAM since we’re remapping interrupt table in RAM now. So, RTOS shouldn’t use the first 192 bytes otherwise we’ll override the interrupt vectors for anything.
Thanks. Your post is really helpful to our project.
Can we remap the vector table in the end of the bootloader instead of in the beginning for the main app? I think it is more clean this way.
Hi, Actually the interrupt vector must be at the beginning of your image, because the reset, stack pointer etc are located there. If you see in figure 3, you’ll understand: “The STM32F030CC has a [3][4] interrupt vector table located on the first 192 bytes of memory.” So you’ll remap these first bytes into your RAM.
Or maybe I didn’t understand your question! =D
Glad that this article helped you.
Nice article! It really help we writing a boot loader.
One note – what about using “Vector table offset register (VTOR)” instead of copying the vector table and using “SYSCFG memory remap register (SYSCFG_MEMRMP)”.
I was not able get working code using MEMRMP register – it looks like values are stored in some cache and even after remapping the ARM uses old values. The VTOR register solution worked fine for me.
It’s nice to know that it helped someone! =D
VTOR doesn’t exist in M0 microcontrollers, that’s why we remap vector table. For M3/M4 for example you can do that for sure.
Hi, Thanks for nice article.
I am trying this and facing some issues. Can you help me please? Ideally by email OR other faster way?
Thanks
Thanks for your email. I able to sort it out already 🙂
Good work, many thanks.
ps: images is broken 🙁 I found a portugal article version – http://www.embarcados.com.br/bootloader-stm32f0/ with images
It’s from Brazil! =D Thank you I’ll fix the images!